Fresh Homemade Croissants

In the Summer of 2018, there had been many times when I’d been seeing a lot of pictures of croissants (thanks mainly to the April baking challenge at Sally’s Baking Addiction,) and I’d been plagued with the idea of making them at home. I’d thought of making puff pastry from scratch, especially while making my favourite egg puff, struggling to stretch out the frozen store-bought puff pastry sheet, but each time I chickened out because I let myself get intimidated by the process. So much folding, resting, folding, rolling, I didn’t think I had it in me. The process for croissants is pretty much the same as puff pastry, except for the use of yeast to make it richer and more bread-like.

As always, I read a variety of recipes, the comments, and common questions to understand all I needed to know about croissants, but when it came to actually working on the process, I kept balking. On the following weekend however, I decided enough was enough. Time to stop acting like a coward! And as usual, when I finished the bake and arranged a pile of steaming, buttery, flaky pastry for breakfast, I felt so stupid for putting it off for so long. Yes, the process takes time and requires a lot of patience, but I promise you, it’s worth it. When you pull the croissant apart and get a look at those layers, that’s instant gratification, right there.

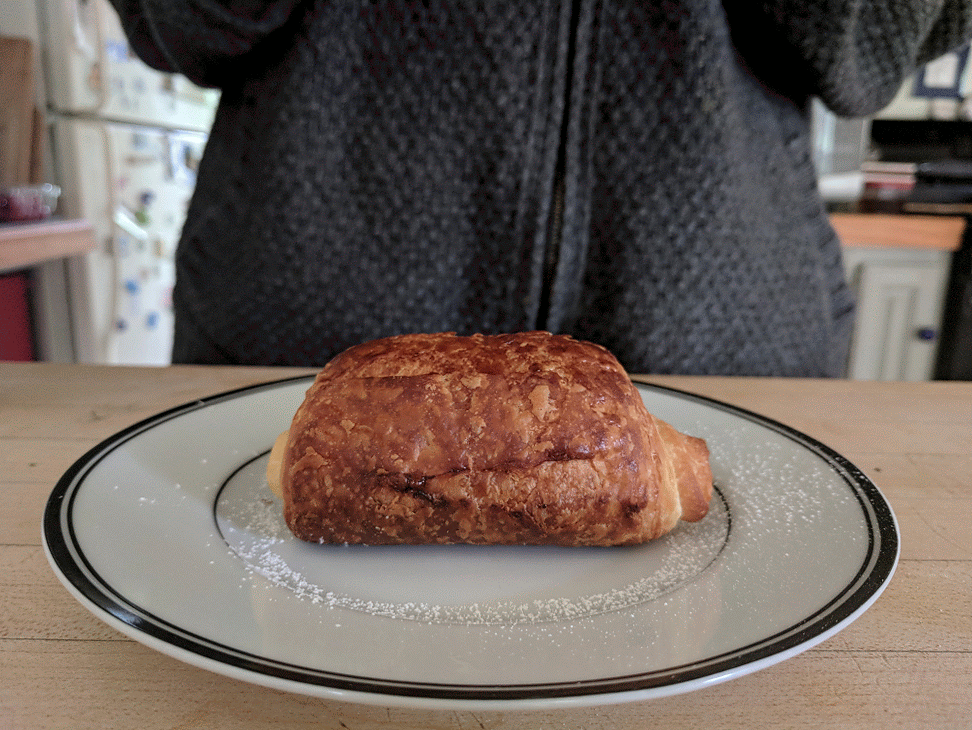
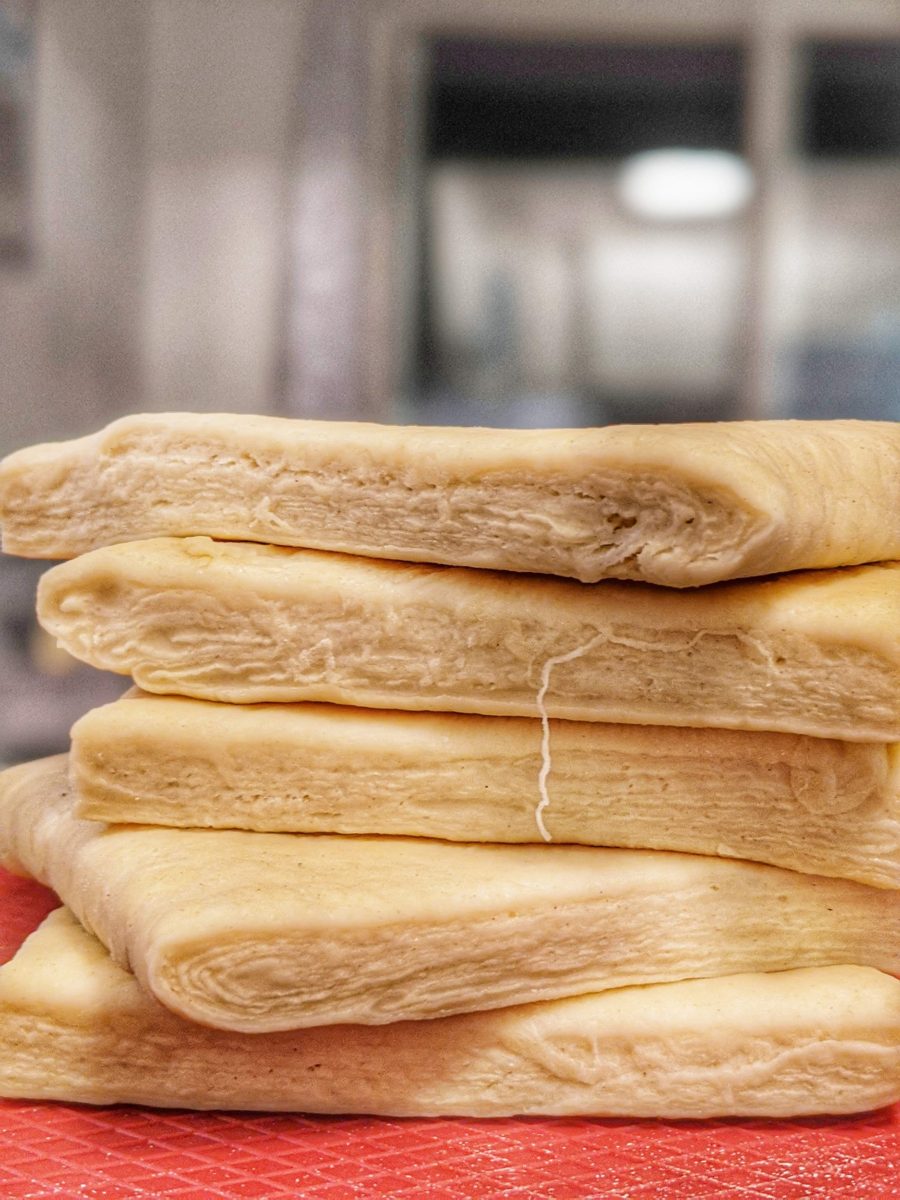
Speaking of layers, this one has 81! Eighty-frigging-one! Butter encased between all those layers, bubbles in the oven creating air pockets, pulling those layers apart, leaving you with a fluffy, melt in your mouth pastry. In a process called lamination, the butter is wrapped in the dough and folded again and again to create the layers. That’s all there is to it. So, how about a weekend project?
Stick with me and I’ll take you step by step to the most lip smacking croissants ever.

This method has two long periods of resting of the dough, four hours or overnight if possible. I planned it such that I started on Thursday evening so that I could have fresh, hot croissants for breakfast on Saturday morning, with two nights for the long resting period. This also allowed me not to break away from my schedule so much. These long resting periods are to ensure that the butter does not warm up with all the kneading. If that happens, then in the oven, the butter will melt faster than the time it would take for the pastry to cook and seal, leaving you with an oily pastry that will have you reaching for a paper napkin.
Let me break down the process and time for you:
- You make the dough, cover it and rest it for 30 minutes.
- You shape the dough into a 14×10 inch rectangle and allow this to rest for 4 hours or more– 1st long resting.
- Half an hour before you work on the dough again, you whip the butter with a bit of flour and shape the butter into a 7×10 inch rectangle and set it in the refrigerator to cool for 30 minutes.
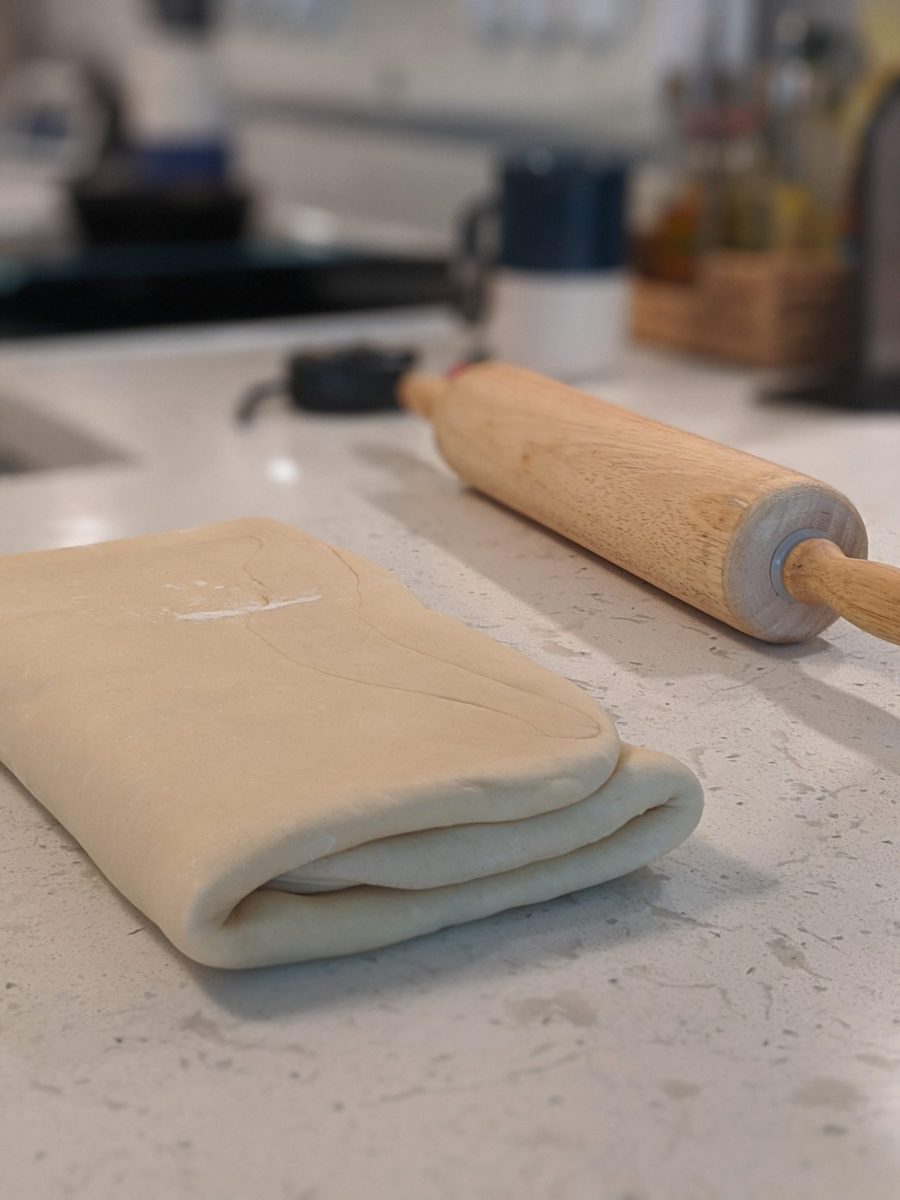
- Wrap the butter in the dough and roll it into a 10×20 inch rectangle. Fold it three fold (like a letter,) and shape it into a 10×20 inch again. Fold this into a three fold again, cover and rest it for 30 minutes.
- Take the dough out and roll it into a 10×20 inch rectangle again. Fold it into a three fold and allow it and your muscles to rest for 4 hours or more– 2nd long resting.
- Next morning, you roll the dough into a 8×20 inch rectangle, cut it into rectangles and shape the croissants. Allow them to rest at room temperature for 30 minutes and in the fridge for 1 hour.
Into the oven they go for 20 minutes and you’ll have yourself some scrumptious croissants that no bakery can match. And, some mad-ass muscles! Because the dough is cold when you are rolling, it’ll be like ‘arms and shoulder day’ at the gym.
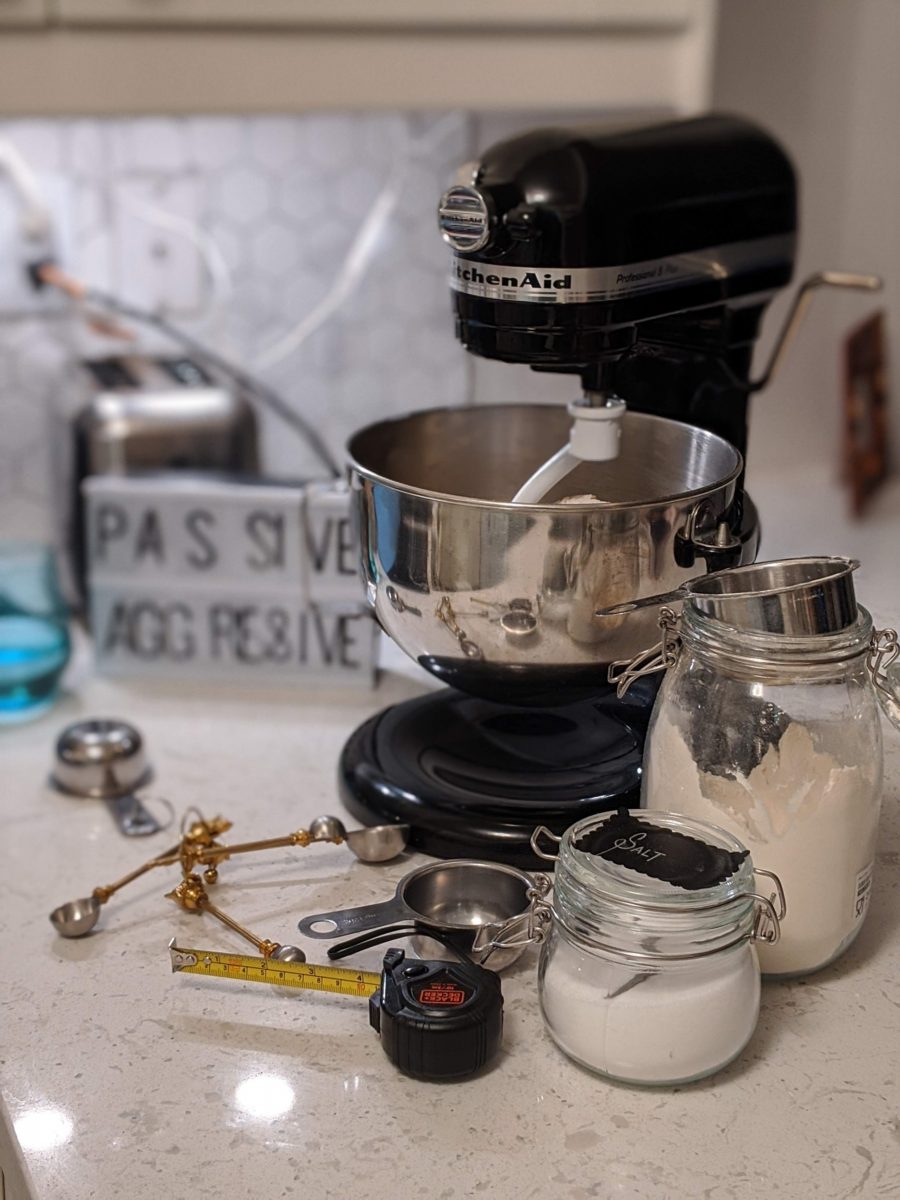
Now, the most important tools you’ll need are your rolling pin and a clean measuring tape. I recommend using a silicone sheet for resting the dough, that way you can just slide it off when it comes to rolling it later.

Okay, get ready with your pencils because we are going to begin and we shall, with the dough. It’s a simple mixture of flour, butter, yeast, salt, sugar and milk, but interestingly, the yeast is not activated by warm milk, but by cold milk instead. Put all these ingredients into the mixing bowl with a hook attachment and beat it for five to ten minutes, until it starts pulling away from the sides. It will sound like one of those old paper mills, but stay close and keep a watch. If you are doing this manually, mix all the ingredients in a bowl and after it has come together, move the dough out to a clean surface and knead like your life depends on it. Knead until the dough is soft and bouncy. Place this on a tray lined with a silicone sheet, press down to flatten the top a little, cover it with a cling wrap and let it rest in the refrigerator for 30 minutes.
The absolute rule when it comes to croissants is that the dough has to be cold at all times. You will work a lot with it, handle it a lot with your hands and if at any point it feels like it is warming up, stop, cover it up and let it cool down in the fridge for about twenty minutes.
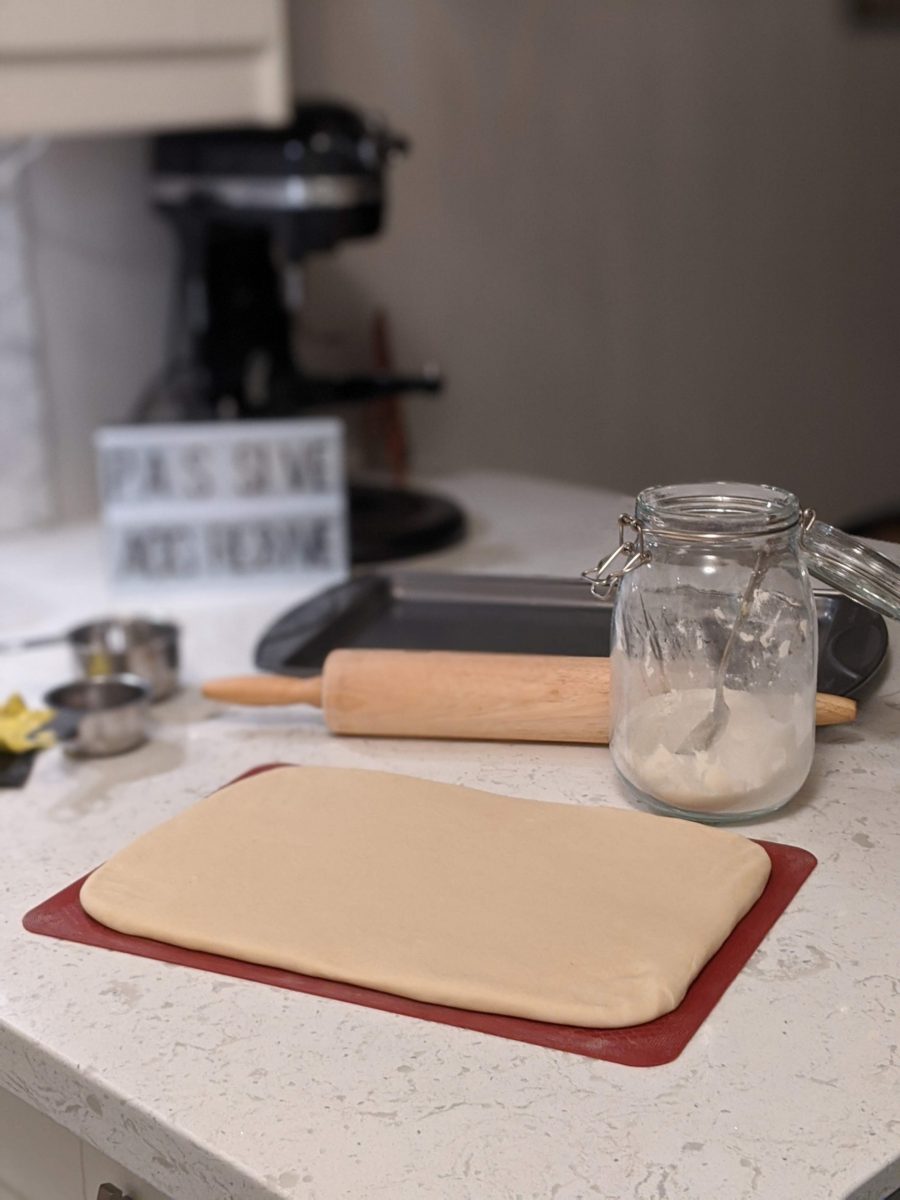
Once the dough has rested, on a lightly floured surface, roll and shape the dough into a 14×10 inch rectangle. Initially, I kept rotating the dough between each roll until I got a reasonable rectangle shape. After that, I kept adjusting the sides to make sure the shape maintained. When it came to be about an inch smaller than the silicone mat, I stopped and checked the size. Be precise with the measurements, because you are going to wrap the butter in it like a gift and you want the butter to be completely encased. So, 14×10 inch exactly. Cover this and allow it to rest for four hours or more. This is where I leave it overnight.
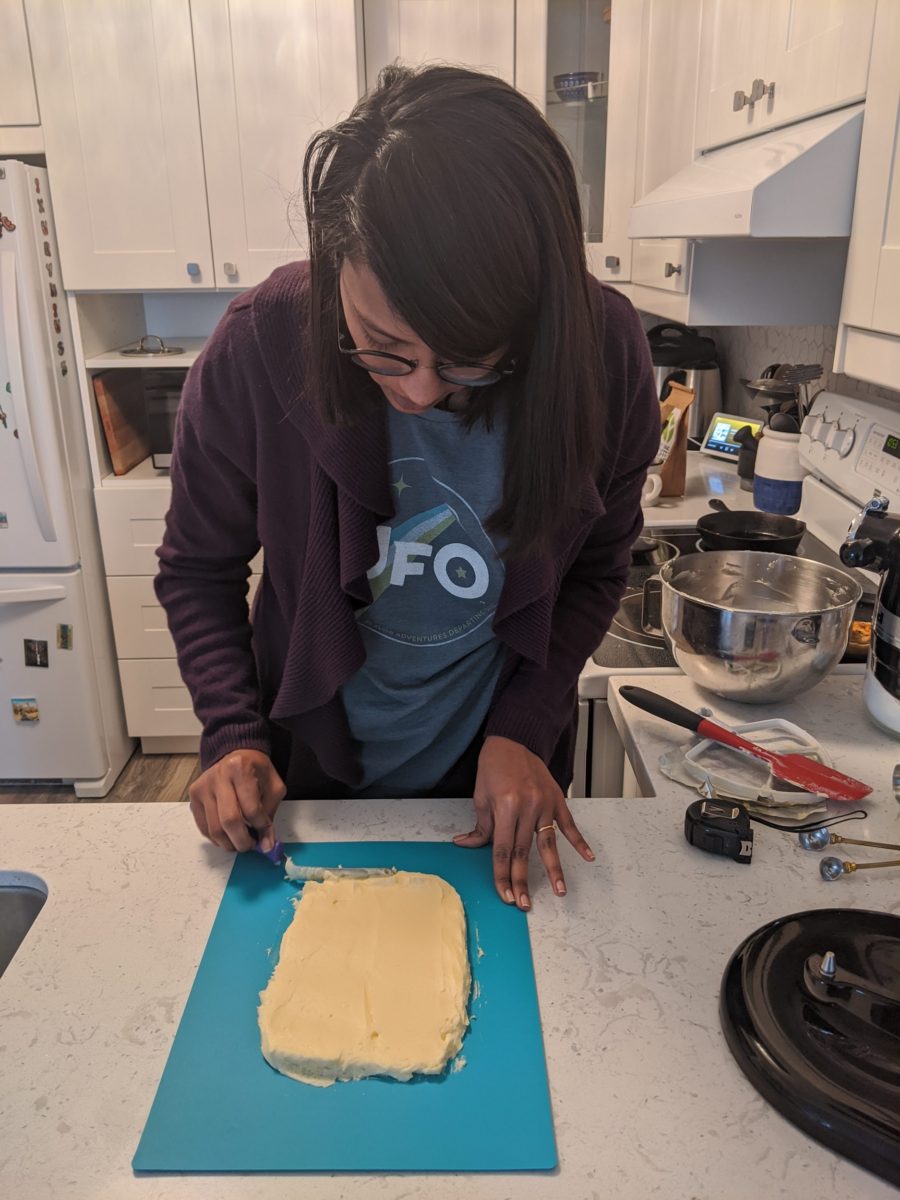
Next morning, we start with the butter, or if you are leaving it just for four hours, work with the butter half an hour before the dough is done. The reason we leave the dough to rest longer is to also allow the yeast to work its magic. Butter, on the other hand, only needs about thirty minutes to set. Now, the secret to what makes these croissants so easy is that plain butter is really hard to shape when it is cold, but with just a bit of flour in the mixture, you have yourself malleable butter, making it easier on your muscles.
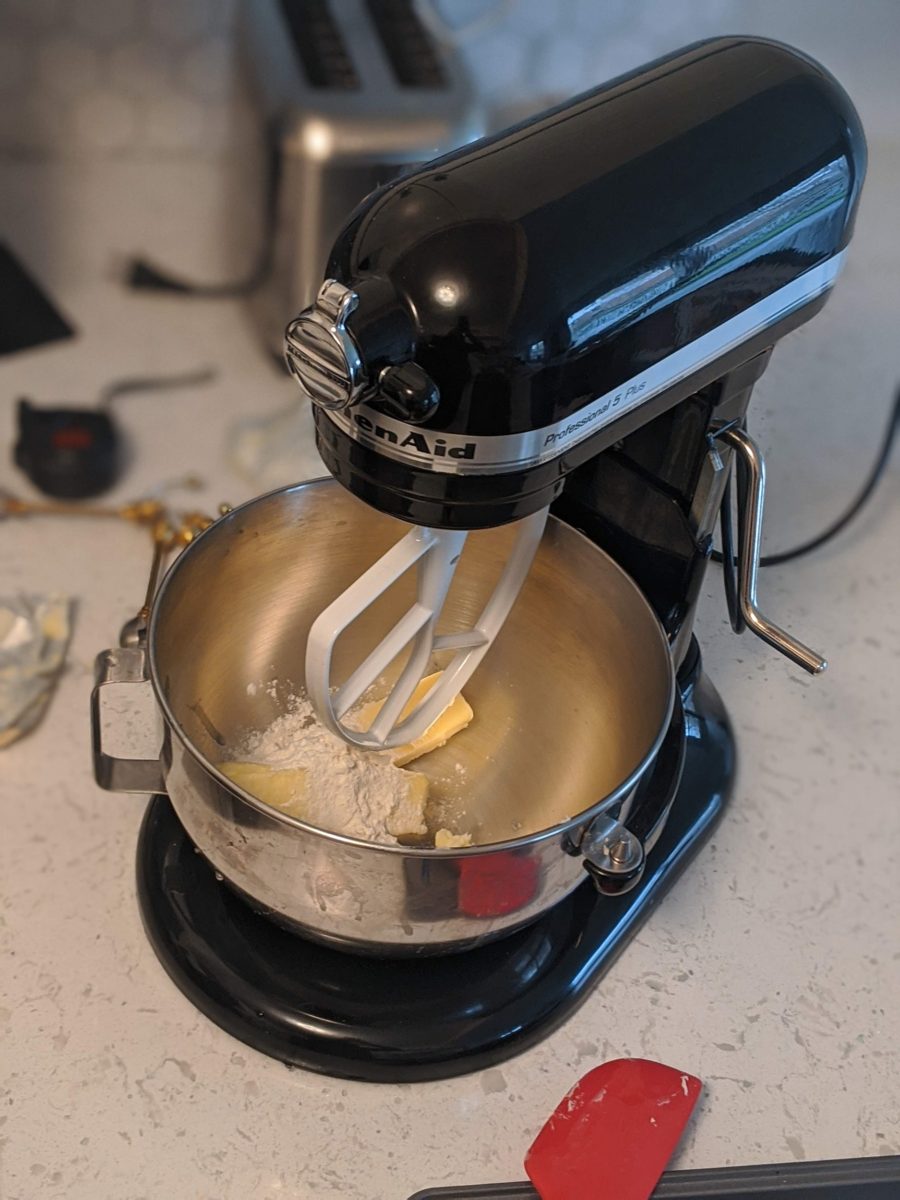
Bring the butter down to room temperature. Cream the butter and flour together until it is well combined, then shape it into a 7×10 inch rectangle on a second silicone sheet or parchment paper. Let this set in the refrigerator for thirty minutes.
When done, pull both the butter and dough out. Remember, from here on, you have to work fast and if at any point you feel that the dough is getting warm under your hands, stop, cover it and and refrigerate for twenty minutes. Peel the butter from the base and lay it right in the middle of the dough and fold it with the extra dough on the sides, just like wrapping a gift. Make sure all the butter is wrapped well, you don’t want it seeping out when you roll the dough.

Now, the lamination process or rather the art of rolling and folding, creating layers. We take breaks during the process to make sure that the dough (and butter) does not warm up. The dough is laminated thrice (creating 81 layers) with a break for 30 minutes between the second and third time. Don’t let the name of the process scare you, it’s basically rolling the dough into a 20×10 inch rectangle and folding it into thirds, like a letter. So, let’s talk layers, how do we get 81?
- When you wrap the butter in the dough and fold over it, that’s the first 3 layers;
- Roll the dough into a 20×10 inch rectangle and fold it into thirds.- 3 x 3, that’s 9.
- Laminate again- 9 x 3, that’s 27.
- Laminate the last time- 27 x 3, that’s 81!
When you’re done with the second round of laminating, take a break, place the dough back on the flour-dusted silicone sheet, cover it and allow it to rest in the refrigerator for thirty minutes.
Once the dough is nice and cool, which it will be in thirty minutes, roll it out into a 20×10 inch rectangle and fold it again. Cover this up and rest it in the refrigerator for four hours or more. This is where I leave it overnight again. You can leave it for up to twenty four hours, so even though I can technically finish the bake by Friday, I leave it until Saturday morning, so that I can have a luxurious brunch to start the weekend.

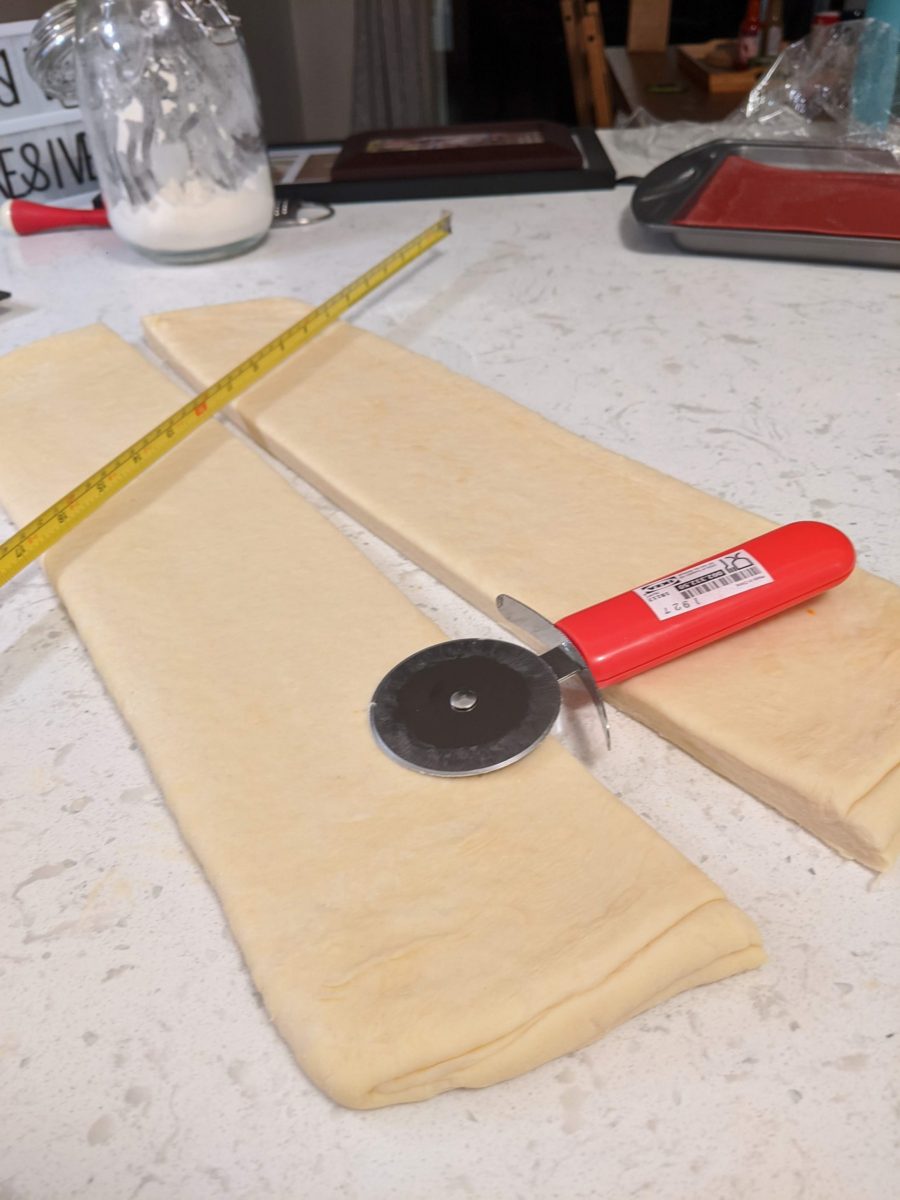
Next step is where we roll, cut, and shape the croissants. After that long resting period, the dough will be cold, so put those muscles to work! Roll it into a 8×20 inch rectangle and with a pizza cutter (or a knife,) divide it once lengthwise and thrice across, leaving you with eight 4×5 inch rectangles.
Leaving one behind, set the others on the tray. Pick it up and admire the heck out of your handiwork! That’s eighty one layers that you have created there.
Compare that with a store bought puff pastry and you’ll never want to pick those boxes up again. It doesn’t even come close. I really didn’t think I was capable of making something like this, and yet, thank you Sally’s Baking Addiction, I can’t stop making them every weekend!
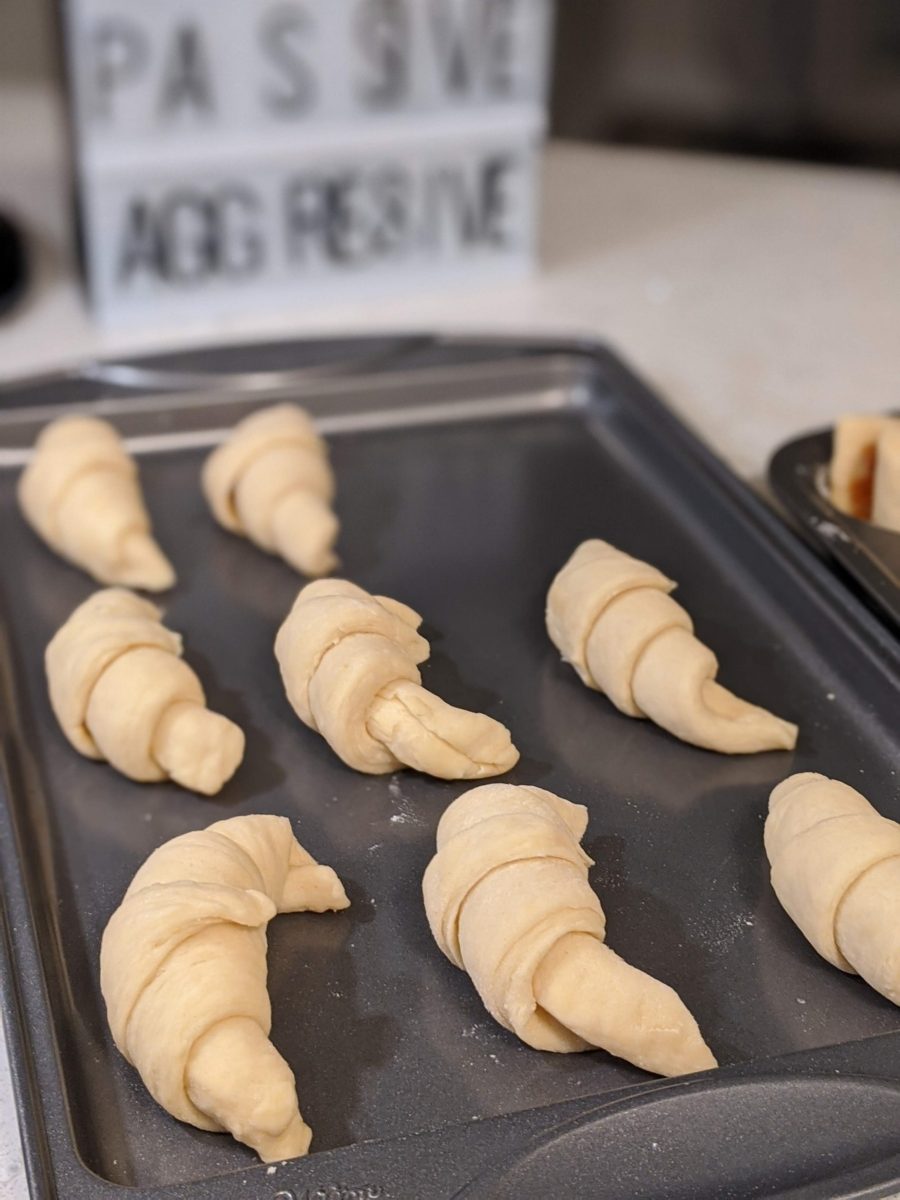
To shape the croissants, take one of those small rectangles and slice it diagonally to create two rectangles. With your hands, gently stretch each of those rectangles to be about eight inches long and cut a small slit at the base. Holding both sides of the bottom, slowly roll it till the end, tucking the tip in the bottom. Curl the sides a bit towards the middle, making a crescent shape. Cover this loosely with cling wrap and let it rest at room temperature. This will allow them to rise and expand, and once that is done, put them back into the refrigerator for about an hour. It is absolutely essential that the dough goes into the oven cold, for otherwise, the butter will melt faster than the dough can cook, leaving you with not just an oily bottom, but a burnt one too. When the dough cooks before the butter melts, it seals it in between the layers and when the butter eventually melts, it creates air pockets and flaky layers.

Egg wash (egg and milk) and into the oven they go at 400F, for about 20 minutes until they are golden brown.
Once they are out of the oven, take the time to relish your hard work! Break open that warm pastry, take in that fresh baked smell, dance about the layers you’ve created, revel in that buttery taste of croissants, and tell yourself “You’ve made frigging croissants!!!”

Soft, flaky steaming croissants made right at home. Up for the challenge? Recipe adapted from Sally's Baking Addiction
In the bowl of the stand mixer (or a large bowl if you are using a hand-held mixer or your hands,) add the butter, flour, sugar, salt, and yeast. Using the hook attachment, gently combine the ingredients on a low-medium speed. Slowly pour in the milk. Increase the speed to medium once all the milk is added. Let this run for about 5 minutes. No matter which instrument you are using, once the dough starts coming away from the sides of the bowl and is soft and bouncy, it's ready to be rested for a bit.
Remove the dough from the bowl and use your hands to shape it into a ball. Place it on a lightly floured silicone sheet or parchment paper. Flatten the dough a little (you can even shape it into a rough rectangle) and cover it with a cling film. Place this on a baking tray and in the refrigerator for 30 minutes.
Clear up some space from the counter and remove the dough from the refrigerator. For this bit, it's easier to work with the dough on the silicone sheet because the size that you are rolling it to, is about the same size of the standard silicone sheet. Flatten the dough a bit using you hand and then start rolling the dough into 14 * 10 inch rectangle, making sure you maintain the shape. It is natural for the edges to want to bend, what I do is to adjust the shape once for every four pumps of my rolling pin.
Place this rolled out dough (silicone sheet/parchment paper) and all onto the baking tray, cover with cling wrap and place it back into the fridge for the long rest of 4 hours or more. This is my first overnight rest.
About 45 minutes before you start working on the dough again, we start the butter layer. This gives the butter just the perfect amount time to harden it, but not too much to make it too hard to work with. Place the butter in a bowl and add the two tablespoons of flour. Cream them together. Once well combined, transfer the butter onto a silicone sheet/parchment paper and using a small spatula, shape the butter into a 7 * 10 rectangle. Make sure you are constantly checking measurements. You don't want to lose ingredients just because the sizes don't fit. Place the butter in the refrigerator for 30 minutes.
Bring the dough out of the fridge while you prep your rolling area. If you have a cold counter, I'd recommend working on it. This helps keep the dough cold while you are rolling it. I usually use my kitchen counter. Remove the dough from the silicone sheet and place it on the counter, with the shorter end near you. Slowly peel the butter from the silicone sheet and place it right in the middle of the dough (making sure there is equal space on the top and bottom.) Encase the butter with the two flaps of dough and seal the edges with your fingers. There should be no butter peeking out. If the butter layer is a little bigger, trim it using a knife or pizza cutter.
The 1st Turn: Lightly flour the counter and with the shorter side close to you, roll out the dough into a 10 * 20 inch rectangle. Again make sure that you maintain the shape of dough to a rectangle. At any time if you see any butter peeking out, just sprinkle some flour on it and continue rolling. Once you have the correct size, fold the dough onto itself into three parts, like how you would do a letter. You can see the video of it earlier in the article.
The 2nd Turn: If you feel that dough is too warm, keep it in the refrigerator for 15-20 minutes before starting again. Usually, this won't be necessary. Turn the dough to have the shorter side close to you and once again roll it into a 10 * 20 inch rectangle. Fold the dough again into three parts like a letter. Place this on a silicone sheet, cover it with cling wrap and place it in the refrigerator for 30 minutes.
The 3rd Turn: Remove the dough from the refrigerator and place it on the counter. Turn the dough to have the shorter side close to you and once again roll it into a 10 * 20 inch rectangle. Fold the dough again into three parts like a letter. Place this on a silicone sheet, cover it with cling wrap and place it int the refrigerator for 4 hours or more. This is my second overnight rest.
Remove the dough from the refrigerator and place it on the counter. Turn the dough to have the shorter side close to you and once again roll it into a 8 * 20 inch rectangle. Using a pizza cutter or knife, carefully measure and cut down the dough vertically. This will leave you with two 4 * 20 inch rectangles. With each rectangle, make three equal cuts horizontally, giving you 4 pieces of 4 * 5 inch rectangles, a total of 8 pieces.
While working with each rectangle, cover up and leave the rest in the refrigerator. Cut the rectangle diagonally creating two triangles. Using your hands or the gentle touch of the rolling pin, stretch the dough into a 8 inches long triangle. Make a small slit at the wide base of the triangle and roll it up, ending at the pointy tip. Hold the edges and slowly move it into a crescent shape.
Repeat with the other pieces of dough. For a variety, you can even load them with chocolate barks. If you'd like to try that, instead of cutting the 4 * 5 inch rectangle diagonally into triangles, divide it vertically in the middle. Stretch this to about 8 inches long. Keep a small piece of chocolate horizontally on the shorter side and roll up the dough.
Place the shaped croissants on couple of lined baking trays. Loosely cover them with cling wrap and let them to rest on the kitchen counter for anywhere between 30 minutes to an hour. Ideally, this is where they bloat up in size. After it's rest on the counter, put them back into the refrigerator for an hour. This is to make sure that the butter is cold and is not the first to melt when the croissants go into the oven.
After the hour in the refrigerator, place the trays on the counter. Preheat the oven to 400 F.
In a small bowl, whisk the egg and milk together. Gently wash the croissants with the mix.
Place the trays in the oven and set the timer for 20 minutes. If you are anything like me, pull yourself a stool to sit next to the stove and watch them bubble and flake. Rotate the trays halfway to get an even browning.
Remove trays from the oven and place the croissants on a wire rack to cool down.
Break one open and enjoy that steamy, flaky, fresh, homemade croissants and give yourself a big pat on the back!